Colored Sand Art in Preschool
By Kayla • April 3, 2018
Preschoolers love projects where they can get their hands messy and explore different sensory materials. Trish, creator of the blog Preschool Playbook, suggests that colored sand is a great way to accomplish both of these tasks!
Supplies You'll Need
- Play sand
- Food coloring or liquid watercolor paint
- Ziploc bags
- Paper towel
- Plastic trays or counter top
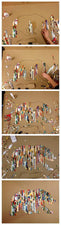
Directions for Making Colored Sand
- Pour play sand into a plastic bag.
- Add several drops of food coloring or liquid watercolor paint and seal the bag. This does not require precise measurement. More drops will create a darker more vibrant color, while less drops will form a lighter shade.
- With the bag properly sealed, massage the liquid color into the sand. Add more coloring and repeat the process if the resulting color is not the correct shade.
- Cover a plastic tray or the counter top with paper towel and pour the colored sand onto it, being sure to press it out in a flat, thin layer to dry.
- Repeat this process to create each of the desired colors.
NOTE: It may also be fun to add a bit of glitter to create "shimmering sand".
Applications for Colored Sand
- With a piece of card stock, school glue, and paint brushes, invite your students to create sand pictures (e.g. have them practice writing specific letters of the alphabet, invite them to write a secret message, encourage them to create a fun pattern, have them draw and "color" their favorite animal, etc.) NOTE: Have them glue one color of sand at a time for best results. The sand will work similar to glitter. Students should paint the portion of paper they want covered with that particular color, sprinkle the area with sand, then shake the excess off.
- Provide students with small jars and invite them to create a 3-D art "sculpture", layering the sand to create fun patterns.
About the Author

Kayla Johnson


Disclaimer: The content on this page is for informational purposes only and reflects the author's personal experiences and/or opinions. The author is not a financial advisor, medical professional, or licensed expert in any regulated field. Nothing on this page should be interpreted as financial, medical, or professional advice. This content is not a substitute for professional advice, diagnosis, or treatment.
Always consult a qualified professional before making decisions related to your finances, health, or other personal matters. The information provided here is shared in good faith, but individual circumstances vary, and what works for some people may not work for you. Results are not typical, implied, or guaranteed. While we strive for accuracy, information may become outdated or change over time. Statements made by guest authors reflect their own opinions and should not be interpreted as endorsements by SupplyMe.
Some of the links on this page may be affiliate or referral links, which means we may earn a commission or bonus if you use them. There’s no extra cost to you — and it’s a great way to support the site if you find the content helpful.